This is my latest quilting challenge.
During a visit to California Christmas 2010, my father handed me a printout of a Geisha in The Snow and asked me if I thought I could “Do something with it?”
I love the simplicity of the image and knew it would translate into a beautiful quilt so I immediately got to work. I love free-style machine embroidering and made the decision to use this technique for the trees and mountains. Free-style embroidery is painting with thread by stitching layers of colors to create an image. Essentially my sewing machine becomes my paintbrush. It is time consuming and obsessive, but the results are stunning! After hours & hours of stitching, I am beginning to see some progress.
I started with a piece of off-white flannel approximately 5 feet by 4 feet and a full-sized sketch of the finished image that I stitched into place. I wrote notes to myself on the sketch as to where tree trunks, pine needles, background and snow would be.
 |
| Full sized sketch stitched into place |
 |
| Pine tree free-style machine embroidery |
 |
| Detail of free-style machine embroidery |
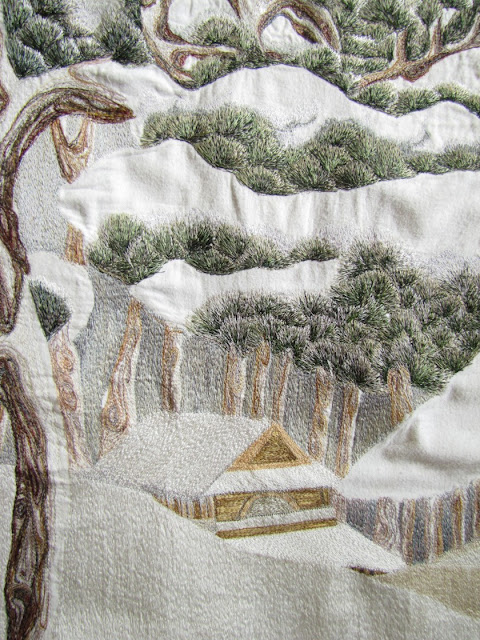
Once I had the sketch tacked down, I began to stitch trees and pine needles leaving the background fabric unstitched creating the mounds of snow. As I progressed throughout the image, I removed the top paper. Little-by-little I made my way through the trees and snow mounds and I have almost completed the background mountains and snow-mounds.
 |
| Detail of pine tree stitching |
It won’t be too much longer before I can start to applique the geisha and add the
machine embroidered border I have created for the top and bottom. I still have to stitchout my border for the sides. I have not decided yet if it will be the same as the top and bottom or if I want to make it different.
 |
| Two-tone satin- Teal and Burgundy |
In case you are wondering, the steel-blue dark sky at the top of the quilt and mountains took 15 bobbins to complete @125 yards each! Unfortunately the depth and detail of color is difficult to capture with my camera. I will attempt to get some photos of my work under natural light once the background is completely finished.
 |
| 8-13-12 |
Yeah! I've trimmed lots of threads, washed, dried and pressed the completed background free-style machine embroidery.
Detail of the house in the snow
 |
| 8-13-12 |
Detail of the top left tree.
 |
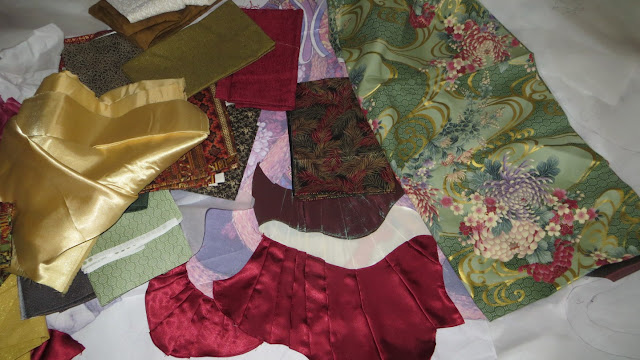
| Fabric selection |
These piles of fabric may or may not be used in the construction of the geisha's dress, umbrella and coat. I will cut and compare one choice over another until I make my final decisions. It is possible by the time I am satisfied with my choices, I will have enough pieces cut to construct one or maybe two more geisha's.
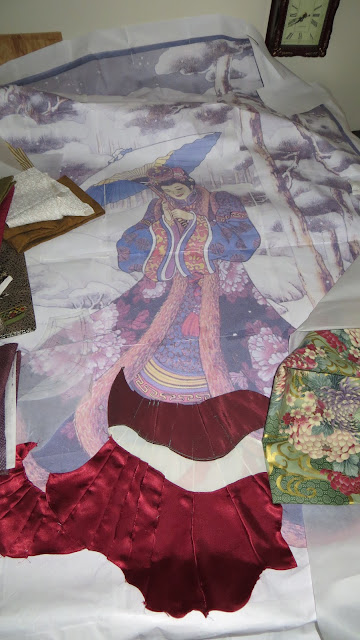
You can see in the photo above how I have constructed the ruffle of her dress. Now I have to make a decision about what fabrics will be used for the top parts of her dress. I have chosen the Hoffman Asian print (shown on the right side of the pile) as the main fabric for the coat. I have to select a few other fabrics that coordinate with this beautiful fabric for the top part of her coat. I am considering a solid burgundy that I will embroider an all-over scattered Asian symbol. But, I have lots of prints to choose from and may use one of them instead.
 |
| Additional ideas for fabrics |
 |
| Dress Ruffle |
The photo above shows the ruffle I have sewn for the geisha's dress. I chose a burgundy satin for the bottom, a white taffeta for the middle and he same two-way satin I am using for the border for the top stripe. This two-tone satin is a deep teal when the light hits it one way and burgundy when light hits it in another. First I stitched the three fabrics together hemming each piece to reduce fraying. Then sewing on the reverse (wrong side) I stitched the ruffles pleats from the top to bottom. Sewing the 'folds' into place will keep the fabric from buckling during the quilting process.
 |
| Cutting out the coat and dress |
I made some headway today with the coat and dress. I have decided to use decorative trims over a gold-glitter fabric for some of the detailing on the dress. Having made this choice, I reduced the number of coordinating fabrics but keep the visual interest.
 |
| Closer view of selected fabrics |
I have pinned the folds of the coat into place and will stitch them into place so they will lay flat. The outside edges of the coat will be hemmed for a clean edge. I will cover the inside edge of the floral coat fabric with fur. I find it is easier to quilt if all my fabric pieces overlap each other.
 |
| Progress 10-7-12 |
Although I have not finished cutting & sewing the Geisha's coat and dress together, I wanted to see how this looked so far. I decided I will be changing the color of the 'fur' trim on the coat as the white I picked fades into the background too much. If I am lucky I will be able to use fabric paint or dye to re-color the white fleece. If that doesn't work, I'll be going back to the fabric store for burgundy, gold or sage fur.
I think I am going to paint the face and hand rather than digitize and stitch it in machine embroidery. However, I may try both to see which I like better.
 |
| I sewed batting to the back of the tree branches to create puffy snow mounds. |
|
|
 |
| I have added trims to the dress, pearls to the coat's edging and lace trim to the sleeves. All of these pieces are now sewn to the backing fabric. |
 |
| Geisha coat and dress stitched to background fabric. I can see the wind billowing her coat toward me! |
I have spent the past couple of weeks making decisions about what trims to use on the dress and coat. I have most of the figure in place, but have to redo the face. I digitized and stitched the face you see in the photo above. It is in scale to the enlarged image, but looks way too small to me. I think I am going to paint the face and hands and make both a bit larger to fit the proportion of the coat better.
I have to finish her face, hands, hat and umbrella. After these are finished, I'll add a piece of batting and backing fabric and quilt the entire piece. After quilting, I have to make a decision about the borders. I'm not sure if I am going to use the borders I digitized and stitched...they may be too busy. I'll make a decision about the borders after I get the last pieces attached.
After fooling around with several new border ideas and not liking any of them it finally came to me. I was trying to combine snowflake designs that looked great until I held them near the quilt-they just didn't have the punch or pizzazz I was looking for. After taking a good look at the image I decided I really liked the idea of using the same trim from the coat as the border however, it is too narrow in proportion to the background. So, I digitized a larger version. My new border isn't exactly like the trim, but it is similar and will tie the whole image together.
Today I spent a number of hours working out ideas for the face. Although I was trying to avoid doing so, I ended up painting it on a white satin. Actually, I painted two as my painting skills are really rusty. I am sure At least one of them will end up being the final face of the Geisha. Tomorrow I will work on the hands and finish the umbrella. Very close to quilting this, Yeah!!
 |
| First try at the umbrella |
|
|
When I finished stitching the umbrella down the first time I sent a photo to my father who quickly pointed out that the angle was wrong. Instead of being tilted behind the geisha's head, it is tilted forward. So, I removed it and corrected the arc of the top red section. I think the results turned out well.
 |
| Second attempt at the umbrella |
In this photo you can see how the top of the umbrella is tilted back a bit more and looks like it is behind the geisha's head.
 |
| Painted Geisha face |
|
 |
| Hand Embroidered Hair |
 |
| Face and Hair |
I hand embroidered the hair and attached it to the face. Although I have painted the hands I have not finished them yet. They may need to be hand stitched into place.My plan is to create her hat by beading a cluster of the small flowers from her coat and adding trim to finish the edges and create the shape of the finished hat. We'll see how well that plan goes.
I sewed the pole for the umbrella and stuffed it so it is rounded. I will have to hand-stitch that into place once I get the hands ready to go. After the face, hands, hat and umbrella pole are in place, I will start to machine embroider stitch the border design I decided on. All 4 sides will have the same border.
Although this top image is almost finished the entire thing will have to be quilted with batting and a finishing backing fabric.
 |
| I spent all day painting these hands... |
 |
| ...Only to realize the hand on the left is way too big and the umbrella handle is too small! |
|
I have tried several approaches for doing the hands & finally settled on a combo of painting and embroidery. However, I wasn't paying attention when I was drawing and the hand on the left turned out too big. I can use the hand on the right, I'll just repaint the other hand and then stitch them in place after I make a longer umbrella handle. Whew, and I thought the face was a challenge!
 |
| Repainted and umbrella stick remade |
 |
| This is the back of the top cloth. Next step, quilting! |
|
 |
| Quilting around the figure |
 |
| I don't have a long-arm quilter. I do all of the work with my Janome |
 |
| Me quilting |
 |
| This quilt is so heavy I found it easier to stand and quilt |
 |
| Much of the background is raised. I added stuffing to the back of the quilt-top before quilting. |
 |
| Detail of tree stitching |
 |
| Quilting is completed. Borders, hat, umbrella and hand stitching is next! | | 12-18-2012 |
|
|
|
|
 |
| Quilted Tree Details |
 |
| Dress Details. I had to hand sew each pearl to reinforce them and keep them from coming off.The lace will have to be tacked down on each side too. |
 |
| Finalized Digitized Border |
 |
| Bottom border stitched on! |
 |
| Top and Bottom Border are Finished 1-19-2013 |
 |
| Detail of Hands and Umbrella Pole |
And so it continues...continuous border stitching
 |
| One of the side borders is complete, but not stitched into place |
I have finished stitching 3 of 4 borders!
While my machine stitches the final length of border,
I have begun to tack down the trim.
Although this will take some time to complete, I can already see an improvement!
I don't know why these photos posted sideways, it's annoying and there doesn't appear to be an option to rotate them. Sorry! You can see that I have finished stitching the border & have all 4 sides stitched to the quilt. I have pinned the outside finishing edges, but have not sewn them yet. The top and bottom I can sew by machine. The two sides will have to be stitched by hand on the back of the quilt.
 |
| Decorative Trim Added To Back |
 |
| Trim On Back- 6-21-13 |
It's Been a while since I have posted any photos or updated my progress. All 4 outside edges have been sewn and finished. I had to add a piece of fabric to each long side and tuck it over to the backing fabric. I then turned the edge under and hand-stitching a blind seam down the entire length. Unfortunately, my hand sewing skills are not great. So, as a way to camouflage the rough-looking edge, I am in the process of tacking down two rows of trim along the inside and outside edge on the back. This is doing the trick, but boy it takes forever to tack this down securely and not have any of my thread showing. It already looks better!
 |
| Let the beading begin! |
 |
I have been adding tiny beads and tacking down the trims I used
on the appliqué dress. |
Once I finish adding beads and trimming threads, I will stitch down the face, collar, umbrella pole and hands. I will also make her an earring and bracelet. Then I have to make a new hanging sleeve for the back and sew that on (unfortunately, probably by hand). I am getting close to finishing!
 |
| I don't own a long-arm quilter. I do all my thread-painting and quilting on my Janome Memory Craft 6600 or my Viking Designer 1. |
It's been quite a while since I have posted any updates. 2014 was a sad year as we had 8th deaths in our family. I lost both my mom and dad. I am grateful though because I saw dad in July of 2014 and was able to show him an (almost) completed quilt. He was blown away by what I done. Remember, it was my dad who got me started on this project in 2011!
My husband and I had a house built in PA and just moved in in April. I probably don't need to tell you how xhausting moving and unpacking is. I had a friend build me a real studio in the basement of our new house. No more tiny - cramped attic with no heat or air conditioning. I have a wonderful studio with lots of space and light!
 |
| My new studio! |
 |
The first order of business in our new home was making curtains. I created this pattern to match my moms china. She gave me several place settings before she passed away. A version of this grape design is available on my My machine embroidery grape design
|
Recently I have been back at it, trying to finish this piece so I can enter it into a contest or two. It seems I am taking 1 step forward and 3 back. I did just change the umbrella....yes, again. This time i really like it. I also stitched the collar to her face, hate that and will be redoing it. And, I stitched the umbrella pole down. Hated half of that. It looks completely broken it's so crooked!. Just have to redo these couple of things and finish beading.
The nicest complement I ever received was after a show and tell talk I had given about my quilts. A woman raised her hand and asked if I could warn her about which contests I would be entering because she didn't want to have to compete with me. I have my eye on the Hampton Roads contest just in case anyone is interested.
 |
| It's early November, 2015. I changed the umbrella, again. Now to get the pole stitched down and have it look straight and re-sew the collar near her cheek! |
I have finally finished!!
Unbelievable.
I feel a little sad that my work is done. I have entered this quilt into the AQS Syracuse show. I think my father would be happy with the finished results. I am.
 |
| Geisha In The Snow Jan 2016 |
 |
Geisha In The Snow
Detail of thread Painting
Top Left |
 |
Geisha In The Snow
Detail |
 |
Geisha In The Snow
Umbrella Beading Detail |
I hope you have enjoyed seeing this quilt come to life.
I have already started a new one. Hmmm, I wonder how long this new one will take me to finish!
If you are interested in seeing more of my quilts or ordering my machine embroidery, please visit my website
http://www.ArtGiftsEtc.com


